🪑 Elevate Your Seating Experience!
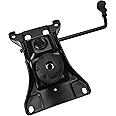
The Heavy Duty Replacement Office Chair Swivel Tilt Control Seat Mechanism is designed for maximum support and comfort, featuring a robust construction that accommodates up to 500 lbs. Its user-friendly tilt control and gas cylinder height adjustment make it an essential upgrade for any office chair, ensuring you stay productive and comfortable throughout your workday.
| Item Weight | 8.14 Pounds |
| Unit Count | 1.0 Count |
| Item Shape | Rectangular prism with cylindrical components |
| Furniture Finish | Black |
| Leg Style | Straight Leg |
| Pattern | Solid |
| Finish Types | Painted |
| Color | Black |
| Back Style | Solid Back |
| Style | Modern |
| Product Care Instructions | Wipe Clean |
| Fill Material | Foam |
| Seat Material | Steel-based material |
| Frame Material | Alloy Steel |
| Material Type | Alloy Steel |
| Maximum Weight Recommendation | 500 Pounds |
| Is Customizable? | No |
| Is Electric | No |
| Is Foldable | No |
| Furniture Base Movement | Swivel |
| Reclining Position Count | 2 |
| Tilting | Yes |
| Special Features | Swivel |
B**C
Very Heavy Duty, Way Better Than OEM
This tilt bracket is just what you need to repair your cracked original bracket from whatever brand of chair that you own. The mounting holes on almost all chairs are pretty much standardized, so this bracket will fit without issue. It does have slotted holes, so there is room for adjustment if your chair is an oddball. No instructions are included, just the bracket in a thick plastic bag, but if you are attempting this you probably have a good idea of what you need to do already.The bracket construction is definitely better than stock, with a metal gauge at least two times that of the OEM bracket.Installation-wise, once you get the old bracket off the lift cylinder, you're set. Just screw this new bracket to your chair bottom and set it on the cylinder post. The problem is getting the old bracket off the lift cylinder post, lol. These tilt brackets use a taper fit between the bracket socket and the lift cylinder post; when you set it on the lift cylinder post it wedges itself in place and becomes almost inseparable. In order to release the bracket from the lift cylinder post, you can do a couple of things:1. Use a pipe wrench and a hammer - grip the cylinder post with a pipe wrench, then use a hammer to whack the bracket in an attempt to spin it and break the wedge fit.or2. Use a rotary tool and a cut off wheel to slice a slot in the tilt bracket's socket and relieve the tension on the wedge fit.I chose option two, see the pictures. Don't worry if you nick the lift cylinder post a bit like I did, it isn't a sealing surface and will be inside the new bracket's socket when you re-assemble the chair.You also might want to take the opportunity to clean and re-grease the swivel bearing in the bottom of your lift cylinder, my chair was kind of rough and slow on its swivel due to grooves that had worn into the two washers that the bearing rides in between, as well as hardened grease. I pulled the cylinder apart - there is an inner, sealed cylinder and an outer cylinder that it slides into. The washers and bearing sit on the tip of the inner cylinder's post, down in the bottom of the outer cylinder. I wiped off all of the old, hardened grease and re-greased it with wheel bearing grease. I also flipped over both of the washers so that the bearing now rides on the smooth, unworn sides. The chair now spins smooth as butter, just like the day I bought it. Use plenty of grease when you do this, that way the bearing and washers don't fall off the inner cylinder post when you reinsert it into the outer cylinder. You can also turn the chair's star base with the outer cylinder still in it upside down to make this step easier.
J**D
Bigger and better
This thing is heavy duty. I was able to use this hardware to replace the old broken hardware. This is way heavier and thicker than the original, but it fit just fine.
N**R
It worked.
This worked beautifully for me and my chair. Chassis on my office chair broke (again). This piece only seems to last for about 2 years no matter how expensive or "heavy duty" an office chair I purchase (my current chair is supposedly rated at 400lbs and I weigh just under 300lbs). Rest of the chair is still awesome. Until now I have always just purchased a whole new chair. Whole new chair is $240+ dollars when the only thing wrong is this part broke. Was not super confident everything would fit when I decided to try replacing this, but it did perfectly and im so happy with the end result. I unscrewed the old chassis from the bottom of my chair with an alan wrench driver, and used the same bolts to attach the new chassis to the bottom of the seat. but a part that broke off of the old chassis was stuck on the base piston. I had to use a dremel tool to cut a slit in that piece then a flat head screw driver to pry it apart so it could be removed, because the new piece would not fit around the piston while that broken off piece of the old chassis remained. but once I got that piece separated from the piston the rest of the assembly was super easy. I will buy this again instead of a whole new chair in a couple of years when i suspect it will inevitably break again. Whole replacement process took well less than an hour, that includes gathering and putting away tools and throwing old parts in the trash can outside.Things to note though. I had to reuse the bolts and washers that held the chairs original chassis in place. I needed an allan wrench driver set and cordless drill to take these bolts out and replace them. I also needed a dremel tool to cut through a broken piece of the old chassis from the piston, it was stuck on there so good that I could not remove it with channel locks or vice grips. had to cut through it and bend it with a flat head screwdriver.
A**R
chair part replacement
As advertised
Trustpilot
2 days ago
5 days ago